
How to Fix External Hard Drive Not Showing Up on Windows 11 — Check Disk Management Before You Panic
You plug in your external hard drive. Windows makes that little USB connection sound — the reassuring “doo-doo” that tells you something was detected. You open File Explorer expecting to see your drive with all your files.
It’s not there.
You check “This PC.” Nothing. You look in the sidebar. Nothing. You unplug it, plug it back in, hear the sound again, check again — still nothing. Your heart starts racing because this drive has years of photos, work files, and backups on it.
Before you catastrophize: in the vast majority of cases, your data is perfectly fine. The drive is connected. Windows knows it’s there. It just isn’t showing it to you in File Explorer because of a software issue that’s usually fixable in under two minutes.
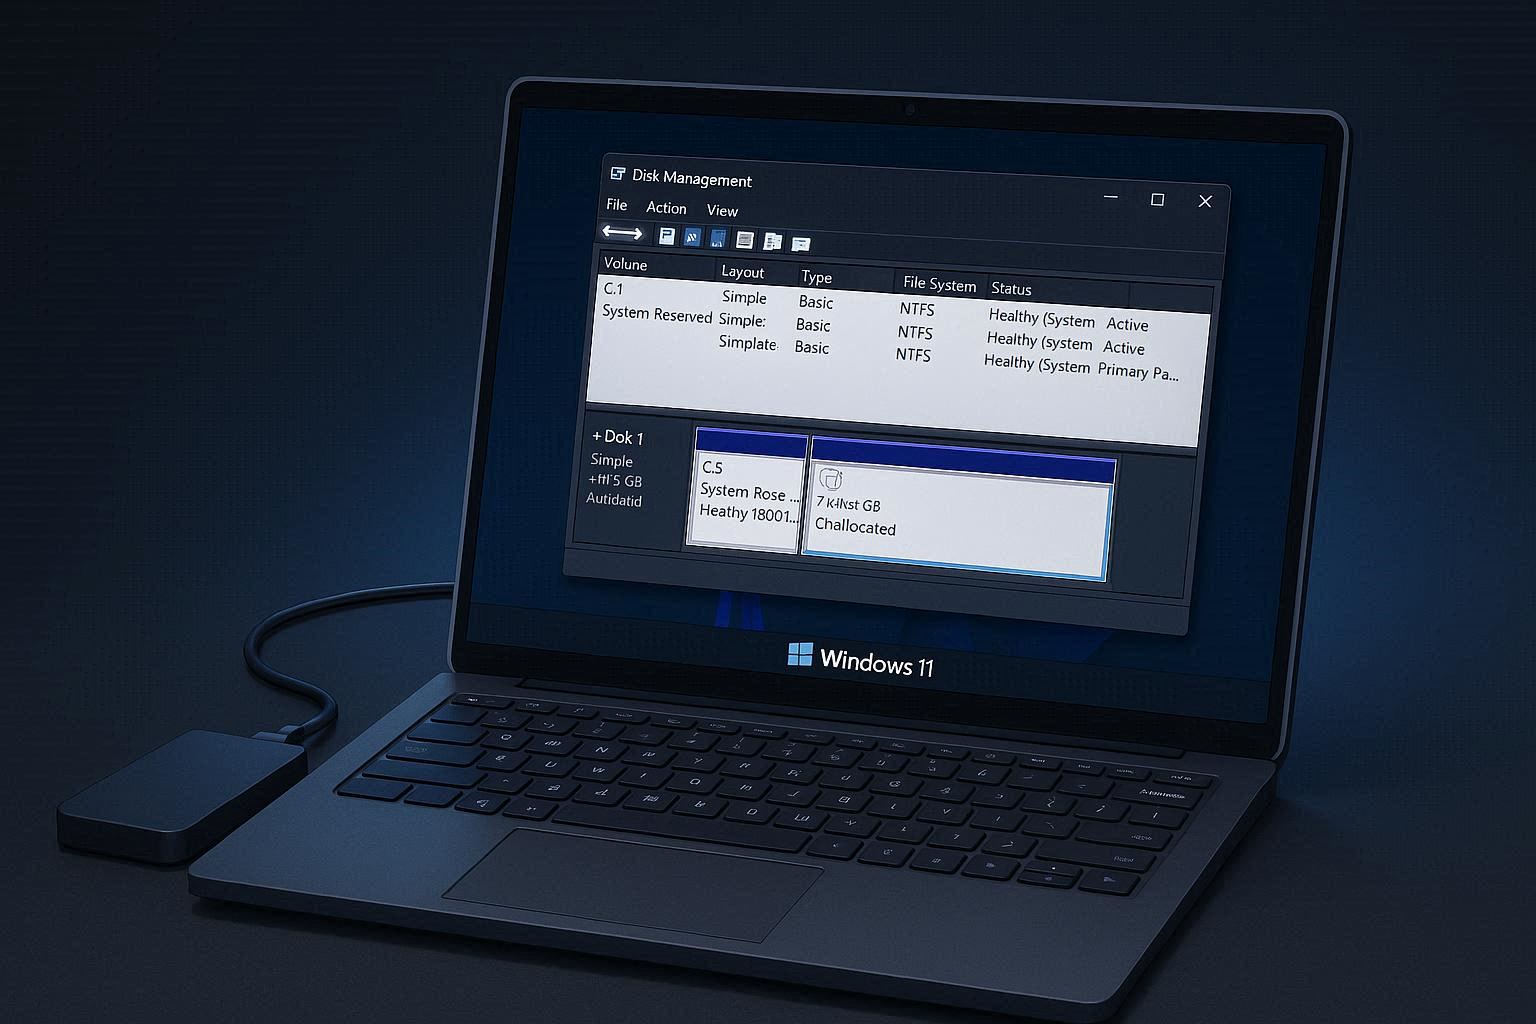
Open Disk Management — The Truth Revealer
This is the tool that tells you what’s actually happening. Right-click the Start button (or press Windows+X) and select Disk Management.
Look at the bottom pane. Your internal drive is Disk 0. Your external drive is usually Disk 1 or Disk 2 — find the one matching the size of your external drive.
What you see next to it tells you exactly what’s wrong:
If you see a healthy partition with a blue bar but NO drive letter (no E: or F: next to it) — this is the easiest fix. The drive is perfectly fine, Windows just failed to assign it a letter.
If you see “Not Initialized” with a black “Unallocated” bar — the drive has no partition table. Could be brand new, or the partition table got corrupted.
If the partition shows “RAW” instead of NTFS or exFAT — the file system is corrupted. Windows sees the drive but can’t read it.
If the drive doesn’t appear in Disk Management at all — physical connection issue. USB port, cable, or the drive itself.
Let’s fix each one.
Fix 1: Assign a Missing Drive Letter (30-Second Fix)
If Disk Management shows a healthy blue bar but no letter, this is the simplest fix in all of tech support.
Right-click the partition (the blue bar). Select “Change Drive Letter and Paths.” Click Add. Pick any available letter from the dropdown. Click OK.
Done. Open File Explorer. Your drive is there. All your data is intact. Total time: 15 seconds.
Why does this happen? Windows assigns drive letters automatically but gets confused when multiple drives, card readers, or network drives compete for the same letters. It can also happen after a Windows update resets certain mount point settings.
Fix 2: Initialize a Disk
If Disk Management shows “Not Initialized” with “Unallocated” space:
If the drive is brand new — it needs to be initialized and formatted. Right-click where it says “Not Initialized” > Initialize Disk > choose GPT (modern standard) > OK. Then right-click the Unallocated space > New Simple Volume > follow the wizard. Choose NTFS for Windows-only, or exFAT if you need Mac compatibility too.
If the drive previously had data — STOP. Do NOT initialize. Initializing writes a new partition table over the old one, which makes your existing data harder to recover.
Instead, try TestDisk (free, open-source tool from cgsecurity.org) — it can scan for lost partitions and rebuild the partition table without erasing data. If TestDisk finds and restores the partition, your drive appears with everything intact. If TestDisk can’t find it, try Recuva or PhotoRec to recover individual files.
Fix 3: Deal With a RAW File System
If the partition shows RAW instead of NTFS or exFAT, the file system is corrupted. This typically happens from unsafe eject (pulling the drive without “Safely Remove”), power loss during a write, or gradual storage degradation.
Do NOT format it if you want to keep the data.
Option A: run chkdsk X: /f (replace X with your drive letter) in admin Command Prompt. It can sometimes repair the file system on the spot. If chkdsk says “Chkdsk is not available for RAW drives,” it couldn’t fix it.
Option B: use TestDisk (free, from cgsecurity.org). Its partition recovery feature can often rebuild the file system metadata from the data on disk.
Option C: use Recuva or PhotoRec to recover individual files from the RAW drive to a different drive. Once your data is safe, format the drive fresh.
Fix 4: The Drive Doesn’t Appear at All
If Disk Management doesn’t show the drive at all, it’s a physical issue.
Try a different USB port — use one directly on the motherboard (back of a desktop, side of a laptop). Front-panel USB ports and hubs sometimes can’t deliver enough power for external drives, especially larger 3.5-inch desktop drives.
Try a different cable. USB cables can fail silently — they provide power (the light comes on) but not data.
If it’s a larger external drive, make sure the power adapter is plugged in and the drive’s power switch is on. I’ve been “troubleshooting” a dead drive for 20 minutes before realizing it had a power switch that was off.
For mechanical hard drives, put your ear close to it. Spinning sound = getting power, issue is likely data connection. Clicking or grinding = mechanical failure — power it off immediately if data is important, and contact a professional recovery service. Silence = no power at all.
Check Device Manager under Disk drives and Universal Serial Bus controllers. Look for yellow warning triangles. If you find one, right-click > Uninstall device, unplug the drive, wait 10 seconds, reconnect. Windows reinstalls fresh drivers.
The “Safely Remove Hardware” Sermon (Briefly)
You’ve heard this a million times. But “Safely Remove Hardware” exists specifically to prevent the RAW file system nightmare. When you write to an external drive, Windows doesn’t always write immediately — it buffers data for performance. Yanking the drive mid-write can corrupt the file system.
Click the USB icon in the system tray, select your drive, wait for the “Safe to Remove” notification, then unplug. Or right-click the drive in File Explorer and select Eject. Those two seconds save you hours of troubleshooting.
When the Drive Is Actually Dead
If you’ve tried every port, every cable, on multiple computers, and the drive isn’t detected anywhere — it’s probably dead. For mechanical drives, this means motor failure, head crash, or controller failure. For SSDs, flash cell degradation or controller failure.
If the data is irreplaceable, do NOT attempt further DIY recovery. Every power-on attempt with a damaged drive risks permanent data loss. Professional services like DriveSavers or Ontrack have cleanroom facilities — expensive ($300-1500+) but often recover data from drives that seem completely dead.
The takeaway: external drives are not permanent storage. They fail. Keep important data in at least two places — the drive AND cloud backup — so when one fails, you still have a copy.